一、安装下载Node.js、Vscode、Git
1.1 安装可以看这篇博文的第2点 《在Windows系统下安装Node.js》的1-6点(补充除外):https://blog.csdn.net/loze/article/details/94208742
1.2 补充:上面博文的补充地方镜像有问题。 应执行下面语句:
1 | (如果不小心跟着1. 执行了补充,先运行这个,否则没必要) |
1.3 (可选)将npm的安装路径修改到其他盘避免占用C盘:https://blog.csdn.net/Deng872347348/article/details/121646375 只做到 “接下来设置环境变量,关闭cmd窗口,“我的电脑”-右键-“属性”-“高级系统设置”-“高级”-“环境变量”” 之前的步骤
二、安装Hexo
2.1 新建 Blog 文件夹,进入此目录下
2.2 安装Hexo脚手架.下面的命令会把hexo.cmd安装到全局包仓库中,由于该仓库文件夹在Windows系统的path中。所以你就可以在任意位置执行hexo命令了。
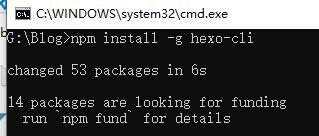
1 | npm install -g hexo-cli |
我这里是安装过了所以是显示这样的
2.3 执行一下命令确认hexo安装完好。这里执行如果报错(hexo‘ 不是内部或外部命令,也不是可运行的程序),请参考该内容以配置Hexo的环境变量:https://blog.csdn.net/Deng872347348/article/details/121646375 的 “接下来设置环境变量,关闭cmd窗口,“我的电脑”-右键-“属性”-“高级系统设置”-“高级”-“环境变量”” 及其之后的步骤 ,如果在2.2步之后不小心重新设置了npm的全局文件夹,则重新执行2.2的npm install -g hexo-cli命令,但可能会出现权限问题,请以管理员身份运行cmd或者修改nodejs文件夹权限,可以看该网址中的方法二。解决以上问题后执行下面命令。
1 | hexo -v |
2.4 新建一个空文件夹用于初始化Hexo,启动cmd并进入到文件夹中。
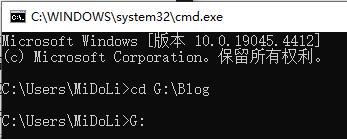
执行Hexo初始化命令
1 | hexo init |
2.5 cmd命令中进入到themes文件夹

2.6 cmd命令中执行如下命令,下载 Next主题
1 | git clone https://github.com/theme-next/hexo-theme-next |

文件夹多出文件

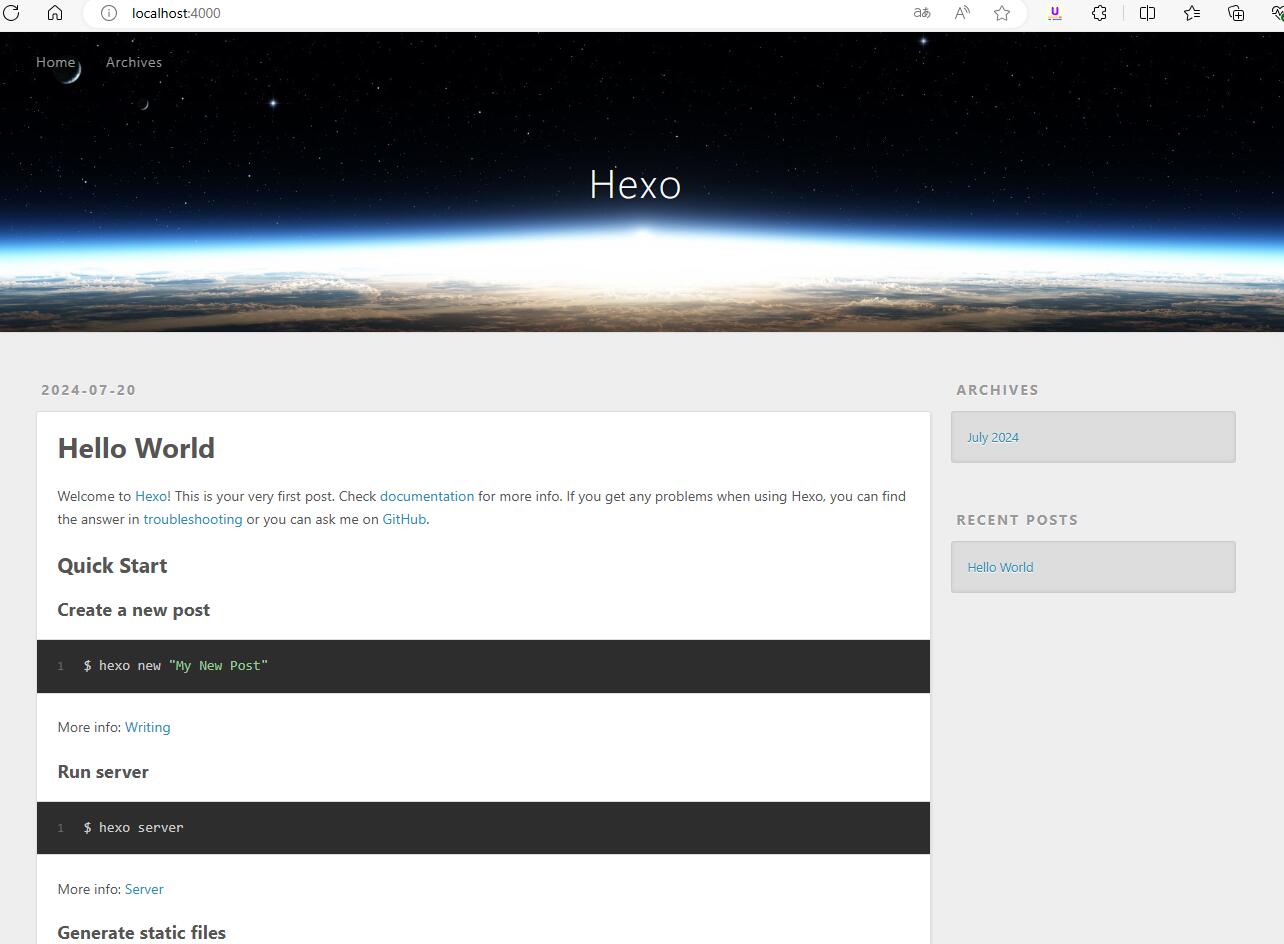
2.7 cmd中启动本地服务查看

1 | hexo s |
在浏览器中输入http://localhost:4000/ 即可看到目前的界面
2.8 一些相关命令
- hexo clean:清除 public 静态目录
- hexo s:本地启动默认指定 4000 端口预览 (s 是 server 是缩写 也就是启动 hexo 服务)
- hexo g:生成 public 静态目录
- hexo d: 部署
- hexo n: 新建文章。示例hexo n “我的博客” == hexo new “我的博客” #新建文章
- hexo p == hexo publish
- hexo server -p 5000 #更改端口
- hexo server -i 192.168.1.1 #自定义 IP
- hexo new draft 草稿文件名。新建草稿命令如下,草稿不会在博客上显示。
三、配置文件设置
3.1 配置文件说明
在 Hexo 中有两份主要的配置文件,其名称都是 _config.yml。
- 站点配置文件:位于站点根目录下(/_config.yml),主要包含 Hexo 本身的站点配置,内容如下:
1 | # Hexo Configuration |
-
主题配置文件:位于主题目录下(themes/hexo-theme-next/_config.yml),这份配置由主题作者提供,主要用于配置主题相关的选项。
-
设置站点配置文件主题为 next。(用于我clone下来的next的文件夹名为hexo-theme-next),所以要将主题设置为 hexo-theme-next 而不是next
1 | # Extensions |
3.2 主题方案设置
在主题配置文件中
1 | # Schemes |
3.3 配置menu
- 在站点配置文件中
1 | # Site |
- 在主题配置文件中
1 | # Usage: `Key: /link/ || icon` |
3.4 隐藏网页底部 powered By Hexo / 强力驱动(TODO)
全局搜索并注释掉相应代码即可(我就没注释了)
1 | <!-- 删除 “由 Hexo & NexT.Gemini 强力驱动” --> |
3.5 配置代码块高亮风格
highlight 和 prismjs 是两种代码块风格,现在 highlight 是主流,且二者只能开启其一。
- 站点配置文件
1 | highlight: |
- 主题配置文件
1 | codeblock: |
代码风格我就直接用的默认的 normal
复制按钮可以选择default | flat | mac三种风格
可在 https://theme-next.js.org/highlight/ 中查看各个代码风格主题,选择自己喜欢的代码风格
3.6 文章添加阴影(TODO)
找到文件blog\themes\hexo-theme-next\source\css\_common\components\post\post.styl (旧版可能是index.styl文件),并在修改其中use-motion的内容
1 | .use-motion { |
3.7 显示当前浏览进度
1 | back2top: |
3.8 文章分享功能
等有了域名以后才能在addthis中配置
3.9 Local Search本地搜索
- 安装插件 hexo-generator-searchdb,执行以下命令:
1 | npm install hexo-generator-searchdb --save |
- 修改 hexo/_config.yml 站点配置文件,新增以下内容到末尾位置:
1 | search: |
- 修改 主题配置文件,启用本地搜索功能:
1 | # Local search |
我还将 页面打开时预加载搜索数据设置为了true 这个看个人需要。
3.10 设置favicon.ico图标(TODO)
在 EasyIcon 中找一张(32 * 32)的 ico 图标,或者去别的网站下载或者制作,并将图标名称改为 favicon.ico,然后把图标放在 /themes/next/source/images 里,并且修改主题配置文件:
1 | favicon: |
3.11 修改文章底部的#号的标签
新版本的next无需修改
3.12 增加文章字数统计和阅读时长
- 安装 hexo-word-counter 插件
1 | npm install hexo-word-counter |
- 站点配置文件,将以下内容粘贴在末尾位置
1 | # 增加文章字数统计及阅读时长功能 |
- 在NexT主题配置文件添加如下配置(NexT主题已支持该插件,有的话无需再添加)
1 | # Post wordcount display settings |
3.13 阅读全文
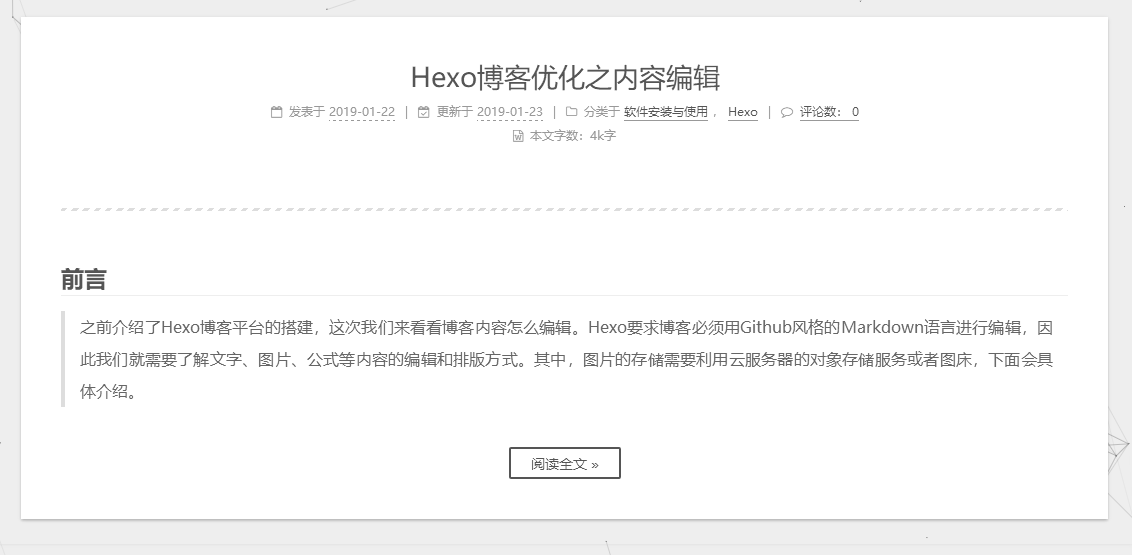
直接在文章中添加 来精确控制摘要内容,即控制 Read More(阅读全文) 的位置
我们可以添加前言引用来对文章进行总结提炼 详情可点击阅读全文~
3.14 添加作者头像
进入主题配置文件,找到下面这行
1 | avatar: |
上传自定义的图片到下列目录:/themes/hexo-theme-next/source/images/,更改 avatar 路径完成! (我clone下来的next项目名是hexo-theme-next,有的是next,所以看清自己的路径)
1 | # Sidebar Avatar |
3.15 添加页面顶部加载条(TODO)
全局搜索 pace 然后设置 pace: true 开启
1 | pace: |
我看最新版本next没有这个color的参数,可以自行设置看看
3.16 添加本站运行时间
修改 /blog/themes/hexo-theme-next/layout/_partials/footer.swig 文件,在末尾加入如下代码:(我clone下来的next项目名是hexo-theme-next,有的是next,所以看清自己的路径)
1 | <!-- 网站运行时间的设置 --> |
3.17 鼠标点击动画
- 爱心特效
- 在 /themes/hexo-theme-next/source/js/ 下新建文件 clicklove.js 并添加代码:(我clone下来的next项目名是hexo-theme-next,有的是next,所以看清自己的路径)
1 | !function(e,t,a){function n(){c(".heart{width: 10px;height: 10px;position: fixed;background: #f00;transform: rotate(45deg);-webkit-transform: rotate(45deg);-moz-transform: rotate(45deg);}.heart:after,.heart:before{content: '';width: inherit;height: inherit;background: inherit;border-radius: 50%;-webkit-border-radius: 50%;-moz-border-radius: 50%;position: fixed;}.heart:after{top: -5px;}.heart:before{left: -5px;}"),o(),r()}function r(){for(var e=0;e<d.length;e++)d[e].alpha<=0?(t.body.removeChild(d[e].el),d.splice(e,1)):(d[e].y--,d[e].scale+=.004,d[e].alpha-=.013,d[e].el.style.cssText="left:"+d[e].x+"px;top:"+d[e].y+"px;opacity:"+d[e].alpha+";transform:scale("+d[e].scale+","+d[e].scale+") rotate(45deg);background:"+d[e].color+";z-index:99999");requestAnimationFrame(r)}function o(){var t="function"==typeof e.onclick&&e.onclick;e.onclick=function(e){t&&t(),i(e)}}function i(e){var a=t.createElement("div");a.className="heart",d.push({el:a,x:e.clientX-5,y:e.clientY-5,scale:1,alpha:1,color:s()}),t.body.appendChild(a)}function c(e){var a=t.createElement("style");a.type="text/css";try{a.appendChild(t.createTextNode(e))}catch(t){a.styleSheet.cssText=e}t.getElementsByTagName("head")[0].appendChild(a)}function s(){return"rgb("+~~(255*Math.random())+","+~~(255*Math.random())+","+~~(255*Math.random())+")"}var d=[];e.requestAnimationFrame=function(){return e.requestAnimationFrame||e.webkitRequestAnimationFrame||e.mozRequestAnimationFrame||e.oRequestAnimationFrame||e.msRequestAnimationFrame||function(e){setTimeout(e,1e3/60)}}(),n()}(window,document); |
- 在 \themes\hexo-theme-next\layout_layout.swig 文件末尾添加:(我clone下来的next项目名是hexo-theme-next,有的是next,所以看清自己的路径)
1 | <!-- 页面点击小红心 --> |

- 在 themes/hexo-theme-next/source/js/ 里面新建文件 fireworks.js 并添加代码:
1 | ; function updateCoords(e) { pointerX = (e.clientX || e.touches[0].clientX) - canvasEl.getBoundingClientRect().left, pointerY = e.clientY || e.touches[0].clientY - canvasEl.getBoundingClientRect().top } function setParticuleDirection(e) { var t = anime.random(0, 360) * Math.PI / 180, a = anime.random(50, 180), n = [-1, 1][anime.random(0, 1)] * a; return { x: e.x + n * Math.cos(t), y: e.y + n * Math.sin(t) } } function createParticule(e, t) { var a = {}; return a.x = e, a.y = t, a.color = colors[anime.random(0, colors.length - 1)], a.radius = anime.random(16, 32), a.endPos = setParticuleDirection(a), a.draw = function () { ctx.beginPath(), ctx.arc(a.x, a.y, a.radius, 0, 2 * Math.PI, !0), ctx.fillStyle = a.color, ctx.fill() }, a } function createCircle(e, t) { var a = {}; return a.x = e, a.y = t, a.color = "#F00", a.radius = 0.1, a.alpha = 0.5, a.lineWidth = 6, a.draw = function () { ctx.globalAlpha = a.alpha, ctx.beginPath(), ctx.arc(a.x, a.y, a.radius, 0, 2 * Math.PI, !0), ctx.lineWidth = a.lineWidth, ctx.strokeStyle = a.color, ctx.stroke(), ctx.globalAlpha = 1 }, a } function renderParticule(e) { for (var t = 0; t < e.animatables.length; t++) { e.animatables[t].target.draw() } } function animateParticules(e, t) { for (var a = createCircle(e, t), n = [], i = 0; i < numberOfParticules; i++) { n.push(createParticule(e, t)) } anime.timeline().add({ targets: n, x: function (e) { return e.endPos.x }, y: function (e) { return e.endPos.y }, radius: 0.1, duration: anime.random(1200, 1800), easing: "easeOutExpo", update: renderParticule }).add({ targets: a, radius: anime.random(80, 160), lineWidth: 0, alpha: { value: 0, easing: "linear", duration: anime.random(600, 800) }, duration: anime.random(1200, 1800), easing: "easeOutExpo", update: renderParticule, offset: 0 }) } function debounce(e, t) { var a; return function () { var n = this, i = arguments; clearTimeout(a), a = setTimeout(function () { e.apply(n, i) }, t) } } var canvasEl = document.querySelector(".fireworks"); if (canvasEl) { var ctx = canvasEl.getContext("2d"), numberOfParticules = 30, pointerX = 0, pointerY = 0, tap = "mousedown", colors = ["#FF1461", "#18FF92", "#5A87FF", "#FBF38C"], setCanvasSize = debounce(function () { canvasEl.width = 2 * window.innerWidth, canvasEl.height = 2 * window.innerHeight, canvasEl.style.width = window.innerWidth + "px", canvasEl.style.height = window.innerHeight + "px", canvasEl.getContext("2d").scale(2, 2) }, 500), render = anime({ duration: 1 / 0, update: function () { ctx.clearRect(0, 0, canvasEl.width, canvasEl.height) } }); document.addEventListener(tap, function (e) { "sidebar" !== e.target.id && "toggle-sidebar" !== e.target.id && "A" !== e.target.nodeName && "IMG" !== e.target.nodeName && (render.play(), updateCoords(e), animateParticules(pointerX, pointerY)) }, !1), setCanvasSize(), window.addEventListener("resize", setCanvasSize, !1) } "use strict"; function updateCoords(e) { pointerX = (e.clientX || e.touches[0].clientX) - canvasEl.getBoundingClientRect().left, pointerY = e.clientY || e.touches[0].clientY - canvasEl.getBoundingClientRect().top } function setParticuleDirection(e) { var t = anime.random(0, 360) * Math.PI / 180, a = anime.random(50, 180), n = [-1, 1][anime.random(0, 1)] * a; return { x: e.x + n * Math.cos(t), y: e.y + n * Math.sin(t) } } function createParticule(e, t) { var a = {}; return a.x = e, a.y = t, a.color = colors[anime.random(0, colors.length - 1)], a.radius = anime.random(16, 32), a.endPos = setParticuleDirection(a), a.draw = function () { ctx.beginPath(), ctx.arc(a.x, a.y, a.radius, 0, 2 * Math.PI, !0), ctx.fillStyle = a.color, ctx.fill() }, a } function createCircle(e, t) { var a = {}; return a.x = e, a.y = t, a.color = "#F00", a.radius = 0.1, a.alpha = 0.5, a.lineWidth = 6, a.draw = function () { ctx.globalAlpha = a.alpha, ctx.beginPath(), ctx.arc(a.x, a.y, a.radius, 0, 2 * Math.PI, !0), ctx.lineWidth = a.lineWidth, ctx.strokeStyle = a.color, ctx.stroke(), ctx.globalAlpha = 1 }, a } function renderParticule(e) { for (var t = 0; t < e.animatables.length; t++) { e.animatables[t].target.draw() } } function animateParticules(e, t) { for (var a = createCircle(e, t), n = [], i = 0; i < numberOfParticules; i++) { n.push(createParticule(e, t)) } anime.timeline().add({ targets: n, x: function (e) { return e.endPos.x }, y: function (e) { return e.endPos.y }, radius: 0.1, duration: anime.random(1200, 1800), easing: "easeOutExpo", update: renderParticule }).add({ targets: a, radius: anime.random(80, 160), lineWidth: 0, alpha: { value: 0, easing: "linear", duration: anime.random(600, 800) }, duration: anime.random(1200, 1800), easing: "easeOutExpo", update: renderParticule, offset: 0 }) } function debounce(e, t) { var a; return function () { var n = this, i = arguments; clearTimeout(a), a = setTimeout(function () { e.apply(n, i) }, t) } } var canvasEl = document.querySelector(".fireworks"); if (canvasEl) { var ctx = canvasEl.getContext("2d"), numberOfParticules = 30, pointerX = 0, pointerY = 0, tap = "mousedown", colors = ["#FF1461", "#18FF92", "#5A87FF", "#FBF38C"], setCanvasSize = debounce(function () { canvasEl.width = 2 * window.innerWidth, canvasEl.height = 2 * window.innerHeight, canvasEl.style.width = window.innerWidth + "px", canvasEl.style.height = window.innerHeight + "px", canvasEl.getContext("2d").scale(2, 2) }, 500), render = anime({ duration: 1 / 0, update: function () { ctx.clearRect(0, 0, canvasEl.width, canvasEl.height) } }); document.addEventListener(tap, function (e) { "sidebar" !== e.target.id && "toggle-sidebar" !== e.target.id && "A" !== e.target.nodeName && "IMG" !== e.target.nodeName && (render.play(), updateCoords(e), animateParticules(pointerX, pointerY)) }, !1), setCanvasSize(), window.addEventListener("resize", setCanvasSize, !1) }; |
- 打开 themes/hexo-theme-next/layout/_layout.swig,在里添加如下代码:
1 | {% if theme.fireworks %} |
- 打开主题配置文件,末尾添加:
1 | # 鼠标点击动画 Fireworks |
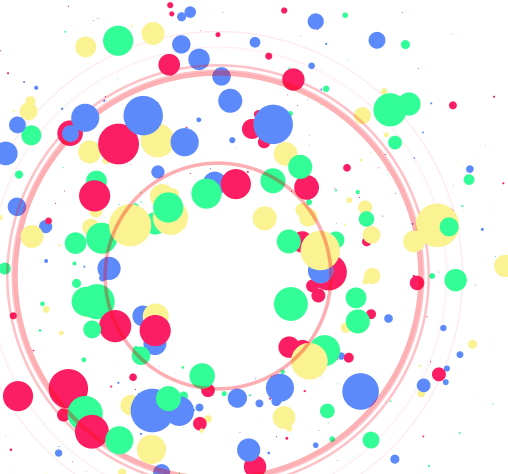
3.18 背景动画
- 丝带背景动画(TODO) 还未启用
1 | # 丝带背景动画 |
- 网格背景动画
- 打开 hexo-theme-next/layout/_layout.swig,在标签内添加代码
1 | {% if theme.canvas_nest %} |
原文怀疑src里的链接配置的 count=99,所以设置了内联式 count=150(默认也是150), 设置后count的数量明显增加
- 配置项
- color:线条颜色, 默认: ‘0,0,0’ ;三个数字分别为(R,G,B),注意用, 分割
- opacity:线条透明度(0~1),默认 0.5
- count:线条的总数量,默认 150
- zIndex:背景的z-index属性,css属性用于控制所在层的位置,默认:-1
- 打开主题配置文件,添加以下代码:
1 | # Canvas-nest |
3.19 文章结束标志
- 在路径 \themes\hexo-theme-next\layout\_macro 中新建 passage-end-tag.swig 文件,并添加以下内容
1 | <div> |
- 打开 \themes\hexo-theme-next\layout\_macro\post.swig 文件,在post-body 之后(END POST BODY),post-footer 之前添加以下代码:
1 | <div> |
3.20 配置live-2d模型
- 安装 hexo-helper-live2d 插件
1 | npm install -save hexo-helper-live2d |
-
这个默认是 shizuku 不用配置,安装后直接在站点显示,但如果想要性能优化,配置模型相关信息的话,需要再安装 shizuku。
-
在站点配置文件中添加参数:(想要配置参数的话,需要重新下载专门的模型包)
1 | live2d: |
- 可供选择模型:
1 | live2d-widget-model-chitose |
- 上面模型的选择可在lived2d中选择,并下载相应的模型:(这里先选择了 wanko作为示例)
1 | npm install live2d-widget-model-wanko --save |
-
安装 shizuku 模型时建议 cnpm,速度很快且用npm安装这个模型容易出现 network error
-
下载cnpm淘宝源(TODO)(我这里就没下载了,直接安装的)
1 | npm install -g cnpm --registry=https://registry.npm.taobao.org |
- 安装 shizuku 模型
1 | npm install live2d-widget-model-shizuku --save |
- hexo-helper-live2d 相当于 live2d 的脚手架,不能只下载 model,删除了 hexo-helper-live2d,live2d 模型无法生成
3.21 侧边栏社交链接
在主题配置文件中,开启 social 并选择想要的社交链接,取消注释
1 | social: |
3.21.1 自定义icon图标
-
首先去 iconfont-阿里巴巴矢量图库 下载 svg 格式的图标,需要什么图标则搜索相应图标并下载,然后把图标放在 \themes\hexo-theme-next\source\images 目录下
-
在 \themes\hexo-theme-next\source\css 目录下的 main.styl 添加代码
这里以 bilibili 和 CSDN 为例: (记得把下载下来的图片名改为bilibili.svg和csdn.svg)
1 | /* 侧边栏图标格式设置 */ |
- 在主题配置文件中,开启 social 并在 social 项下图片来源设置为 fa bilibili 和 fa csdn
1 | social: |
3.22 添加fork me on github入口
- 首先到 GitHub Corners 或者 GitHub Ribbons 选择自己喜欢的图标,然后copy相应的代码粘贴到 themes/hexo-theme-next/layout/_layout.swig 文件中,把代码中的href后面的值替换成你要跳转的地址,比如你的GitHub主页
1 | <a href="https://github.com/ConanGentleman" class="github-corner" aria-label="View source on GitHub"><svg width="80" height="80" viewBox="0 0 250 250" style="fill:#151513; color:#fff; position: absolute; top: 0; border: 0; right: 0;" aria-hidden="true"><path d="M0,0 L115,115 L130,115 L142,142 L250,250 L250,0 Z"></path><path d="M128.3,109.0 C113.8,99.7 119.0,89.6 119.0,89.6 C122.0,82.7 120.5,78.6 120.5,78.6 C119.2,72.0 123.4,76.3 123.4,76.3 C127.3,80.9 125.5,87.3 125.5,87.3 C122.9,97.6 130.6,101.9 134.4,103.2" fill="currentColor" style="transform-origin: 130px 106px;" class="octo-arm"></path><path d="M115.0,115.0 C114.9,115.1 118.7,116.5 119.8,115.4 L133.7,101.6 C136.9,99.2 139.9,98.4 142.2,98.6 C133.8,88.0 127.5,74.4 143.8,58.0 C148.5,53.4 154.0,51.2 159.7,51.0 C160.3,49.4 163.2,43.6 171.4,40.1 C171.4,40.1 176.1,42.5 178.8,56.2 C183.1,58.6 187.2,61.8 190.9,65.4 C194.5,69.0 197.7,73.2 200.1,77.6 C213.8,80.2 216.3,84.9 216.3,84.9 C212.7,93.1 206.9,96.0 205.4,96.6 C205.1,102.4 203.0,107.8 198.3,112.5 C181.9,128.9 168.3,122.5 157.7,114.1 C157.9,116.9 156.7,120.9 152.7,124.9 L141.0,136.5 C139.8,137.7 141.6,141.9 141.8,141.8 Z" fill="currentColor" class="octo-body"></path></svg></a><style>.github-corner:hover .octo-arm{animation:octocat-wave 560ms ease-in-out}@keyframes octocat-wave{0%,100%{transform:rotate(0)}20%,60%{transform:rotate(-25deg)}40%,80%{transform:rotate(10deg)}}@media (max-width:500px){.github-corner:hover .octo-arm{animation:none}.github-corner .octo-arm{animation:octocat-wave 560ms ease-in-out}}</style> |

3.23 更换博客背景
- 更换主背景
-
把准备好的背景图放入 themes\hexo-theme-next\source\images 中
-
新版本需要新建 hexo/source/_data/styles.styl,即在 hexo目录的 source文件夹下新建 _data 文件夹,文件夹中新建 styles.styl。注意:是新建在 hexo目录下 source文件夹里,而不是主题文件 next目录下的 source文件夹,如图:

-
打开 styles.styl,添加如下:
1 | //背景图片设置 |
-
配置项
- background-image:url 为图片路径,可以直接使用链接,也可以是图片路径(将自定义图片放入hexo-theme-next\public\images路径下或者之前提到的themes\hexo-theme-next\source\images中)
- background-repeat:若果背景图片不能全屏,那么是否平铺显示,充满屏幕
- background-attachment:背景是否随着网页上下滚动而滚动,fixed 为固定
- background-size:图片展示大小,这里设置 100%,100% 的意义为:如果背景图片不能全屏,那么是否通过拉伸的方式将背景强制拉伸至全屏显示
- background-size: cover // 填充
-
打开主题配置文件,将 custom_file_path 的 sytle 注释打开。(variable: source/_data/variables.styl是后面3.25-边框圆角才设置的这里可以先不用,但也可以先设置了)
1 | custom_file_path: |
- 添加侧边栏背景
- 对 themes\hexo-theme-next\source\css\_schemes\Pisces\_header.styl 中 site-brand-container的background进行修改
1 | .site-brand-container { |
- 扩展
unsplash是一个高清大图免费下载的好网站,提供了大量的图片和外链API,可以用来当作自己的博客背景
3.24 设置透明度
-
单独给每个区域设置opacity会出现很多问题,例如搜索框弹出会被覆盖图层导致无法进行本地搜索
-
最理想是进行全局设置,在 blog\source\_data\styles.styl 中 直接设置body的透明度为0.85 全体透明化,opacity的值可以自行调整
1 | //背景图片设置 |
3.24.1 文章区域位置调整(TODO,调整了会有问题,建议别调整了,或者查一下错误)
- 在\themes\hexo-theme-next\source\css_common\components\post\post.styl (旧版可能是index.styl文件)设置了布局(调整位置信息) ,不需要的话可以删掉下面的margin和padding(默认值没有设置margin和padding)或者修改其值
1 | .use-motion { |
3.25 边框圆角
- 在之前新建的 _data 目录下新建 variables.styl,类似新建 styles.styl。打开 variables.styl,添加如下:
1 | // 圆角设置 |
- 打开主题配置文件, custom_file_path 中 variable 的注释 这个已经在3.23 更换博客背景中设置过了
1 | custom_file_path: |
- 此时有一个问题就是 侧边栏-分类左下/右下 的圆角明显有一层阴影,下图是修正过的(图片只是为了指明位置)

- 原因是开启 主题配置文件中back2top 的 sidebar 和 scrollpercent,back2top的阴影背景覆盖了圆角,把阴影背景改为透明便可解决,因为我们需要的只是scrollpercent。打开/themes/hexo-theme-next/source/css/_variables/Gemini.styl 内代码,将 $body-bg-color 赋值为透明 transparent
1 | // Variables of Gemini scheme |
3.25.1 修改侧边栏顶部圆角
在 blog\themes\hexo-theme-next\source\css\_common\outline\header\header.styl (旧版可能是index.styl) 中对 site-brand-container(审查元素得知) 进行修改
1 | .site-brand-container { |
左下/右下角不需要设置圆角,不然反而不美观
3.26 调整back2top透明度和位置
- 调整透明度
进入 blog\themes\hexo-theme-next\source\css\_variables\Pisces.styl,根据自身博客修改透明度至满意值。($b2t-opacity-hover 新版没有这个属性 ,看有没有必要设置)
1 | // Back to top |
- 调整位置靠左
调整位置靠左的原因是设计把live-2d放到右边,而此时back2top按钮不管是在live-2d图层上方(不美观)还是下方(按钮无法被点击且看不到百分比)效果都不理想,故把按钮调整至靠左位置
- 在 blog\themes\hexo-theme-next\source\css\_variables\base.styl 中有Back to top的基本参数信息,我们把 $b2t-position-right 和 $b2t-position-right-mobile 注释掉,使其默认靠左
1 | // Components |
这里从right修改成left无效的原因是值没有变 只是换了个变量名
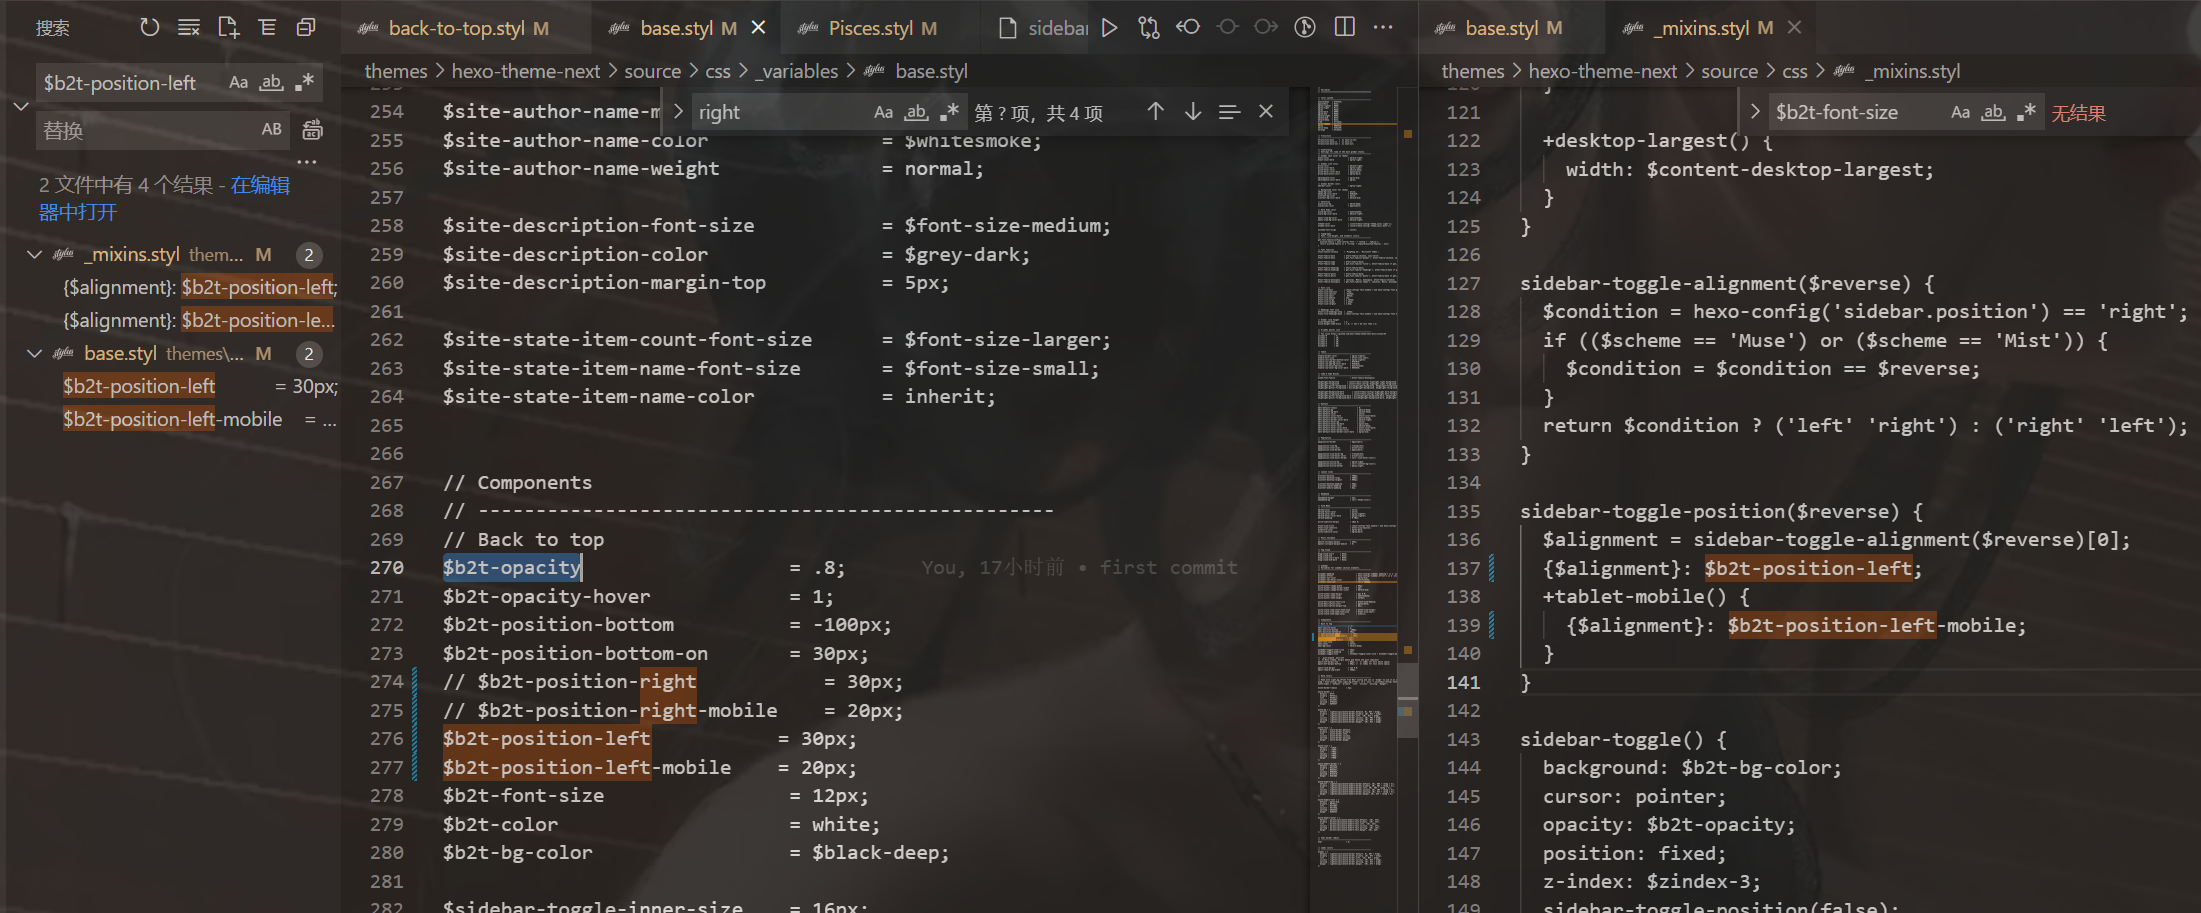
- 然后在 themes\hexo-theme-next\source\css\_common\components\back-to-top.styl 末尾(保证在body里)添加如下两行代码并注释 margin-right: 8px;
1 | if (hexo-config('back2top.enable')) { |
3.27 添加README.md文件(TODO)
每个项目下一般都有一个 README.md 文件,但是使用 hexo 部署到仓库后,项目下是没有 README.md 文件的 (最新的项目好像有了)
- 在 Hexo 目录下的 source 根目录下添加一个 README.md文件,修改站点配置文件 _config.yml,将 skip_render 参数的值设置为(这个需要设置)
1 | skip_render: README.md |
保存退出即可 再次使用 hexo d 命令部署博客的时候就不会在渲染 README.md 文件了
3.28 侧栏Celeste(旋转的小人)
- 这里罗列两种位置摆放效果
- 放在 blog\themes\hexo-theme-next\layout\_macro\sidebar.swig (我选的这种,我觉得这种更好看,而且第二种没有找到合适的位置放,老有问题)
文件中找到以下内容
1 | {%- if theme.back2top.enable and theme.back2top.sidebar %} |
然后替换成以下内容
1 | <div class="twopeople"> |
- 放在 blog\themes\hexo-theme-next\layout_layout.njk
1 | <div class="column"> |
这种方式的动画位置不会固定在浏览器窗口位置,而是会随着滚动而消失
3.29 懒加载开启(性能优化)(TODO)
进入 主题配置文件找到lazyload,修改为true:(我开启后加载不出来界面了不知道为什么,所以就没开了)
1 | # Vanilla JavaScript plugin for lazyloading images. |
3.30 加入网易云音乐播放器
在网页搜索网易云音乐,选择音乐,并生成外链播放器,获取 iframe 标签
1 | <!-- 外链播放器 溯(钢琴版)--> |
- 建议把标签放到侧边栏,在 Blog/themes/next/layout/_macro/sidebar.njk 或 themes\hexo-theme-next\layout_layout.njk 文件下,同理 3.28 celeste旋转的小人的方式选择位置粘贴进去,不同位置效果不同。
我依旧是在blog\themes\hexo-theme-next\layout\_macro\sidebar.swig里面设置的,放在了小人和back2top的按钮中间
1 | <div class="twopeople"> |
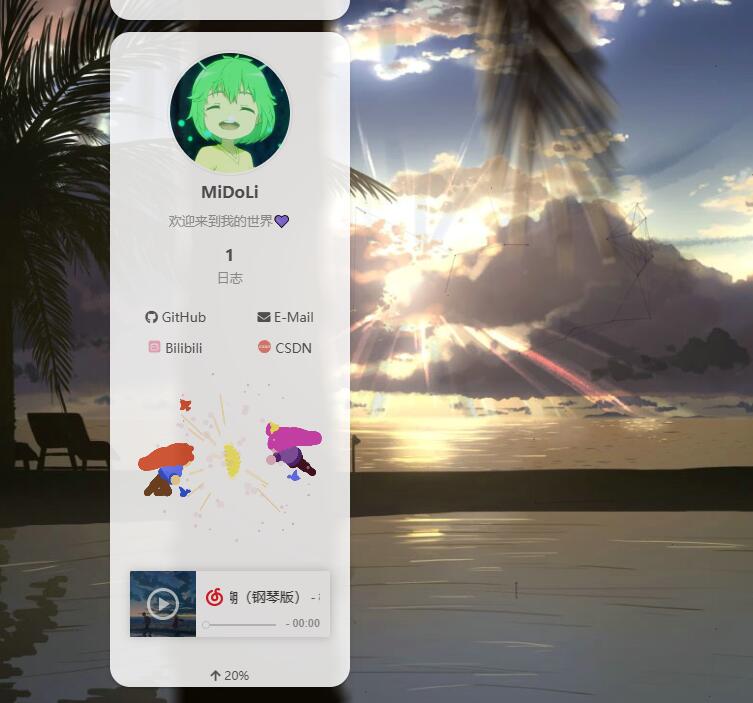
3.31 添加Aplayer音乐播放器(进阶)
由于网易云外链播放器每次只能选择一首歌,如果想要让播放器的功能更加全面丰富,我们可以通过安装插件 Aplayer来满足我们的需求
- 首先,先下载Aplayer源码:APlayer 或者执行以下命令
1 | npm install aplayer --save |
如果通过命令执行则在 blog/node_modules/aplayer中找到dist文件夹
- 将文件中的dist文件夹复制到路径:blog/themes/next/source
- 在目录 blog/themes/next/source/dist 下新建 music.js 文件,内容是:
1 | const ap = new APlayer({ |
歌曲信息可自行添加自己喜欢的
- 配置项(记得都要加引号)
- name:歌曲名称
- artist:作者
- url:连接(具体怎样操作看下面步骤),
- cover:是图片连接,可以是本地图片,也可以是在线图片,本地放在 source/images然后修改路径即可
更多参数(⭐):
1 | const ap = new APlayer({ |
- url添加歌曲方法
- 链接方式url
- 网易云网页播放一首歌曲
- 将网址中的 id 进行复制:https://music.163.com/#/song?id=1411358329,也就是1411358329
- 将下面代码中的 id 修改为你想添加歌曲的 id:http://music.163.com/song/media/outer/url?id=xxx.mp3 (网易云音乐在线播放歌曲模板),即http://music.163.com/song/media/outer/url?id=1411358329.mp3
- 本地方式url
- 先下载好音频问价
- 然后放在themes\hexo-theme-next\source\images里
- url为 ‘/images/音频名字.mp3’
- 引用头文件
我仍然把播放器放在了原来外链播放器的位置blog\themes\hexo-theme-next\layout\_macro\sidebar.swig,内容为:
1 | <link rel="stylesheet" href="/dist/APlayer.min.css"> |
(也可以放在在路径:blog/themes/hexo-theme-next/layout/_layout.swig 文件,然后将下面的代码添加到:<body itemscope …> (在body里面就可以))
完成后需要重新部署才能看到效果
aplayer我采用的是默认的效果,详细信息请查阅 官方文档
- 因为了有了 aplayer 插件 所有原先的 back2top 会被遮挡 需要重新调整位置。 没有影响则可不调整(TODO),放到sidebar没有影响,如果放在llayout中,修改如下:
1 | padding-right: 5px; |
3.32 删除了默认的landscope主题(性能优化)(TODO)
1 | 压缩内存 |
3.33 评论系统
根据网上对国内国外的评价系统对比,可知Valine是近几年大受欢迎的博客评价系统,但由于作者已经放弃了对 Valine 的维护,bug一堆尚未解决,所以最终敲定用基于Valine开发的新版本Waline作为本博客的评价系统。(但我的评价是如果hexo版本不高,建议还是用valine就行了,又快又方便),好像next自带的gitalk也可以评论,有时间可以试试配置gittalk
- LeanCloud 设置 (数据库)
注意!:请使用中国大陆版,国外版已被禁止国内使用- Leancloud已经禁止了国内访问国际版 https://forum.leancloud.cn/t/2022-8/25408
- (1) 登录或注册LeanCloud 并进入 控制台
- (2) 点击左上角 创建应用 并起一个你喜欢的名字 (请选择免费的开发版):
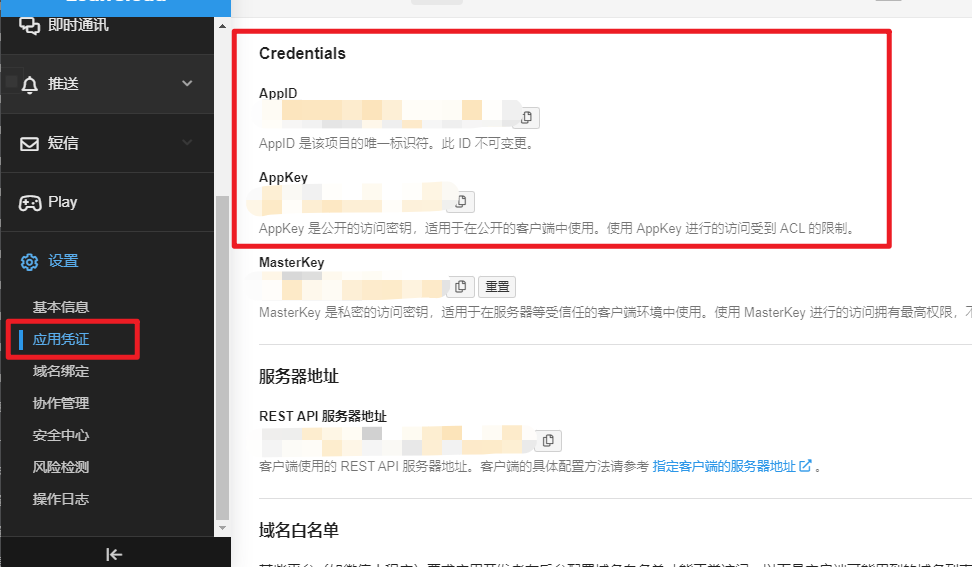
- (3) 进入应用,选择左下角的 设置 > 应用凭证。你可以看到你的 APP ID,APP Key 和 Master Key。请记录它们,以便后续使用。
- Vercel 部署 (服务端)
- (1) 点击进入Vercel,注册登录
- (2) 选择git 作用域以及输入仓库名(最终我的仓库名为midoli_blog),并点击 Create 继续:
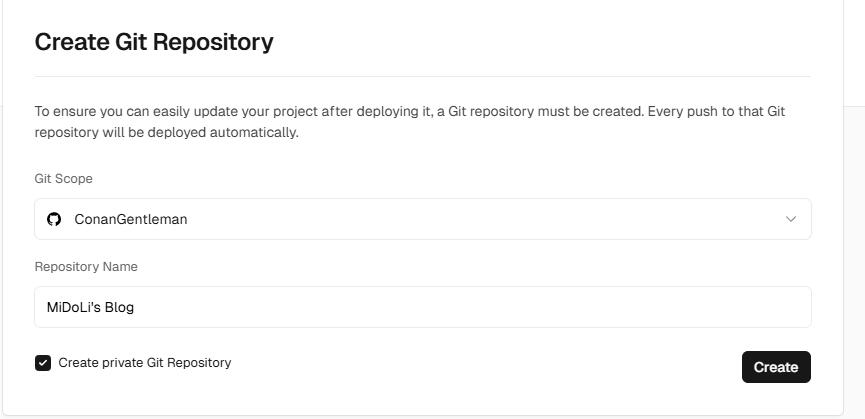
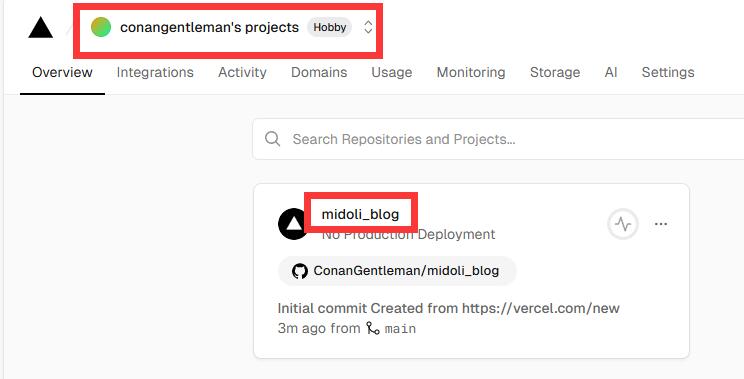
- (3) 此时 Vercel 会基于 Waline 模板帮助你新建并初始化仓库,仓库名为你之前输入的项目名,请等待一会儿
- (4) 构建结束后,点击顶部信息,并点击仓库,找到Settings - Environment Variables 进入环境变量配置页,并配置三个环境变量 LEAN_ID, LEAN_KEY 和 LEAN_MASTER_KEY。它们的值分别对应上一步在 LeanCloud 中获得的 APP ID, APP KEY, Master Key。(需要进入项目中的 Settings,而不是总设置里,总设置里没有 Environment Variables 选项配置)
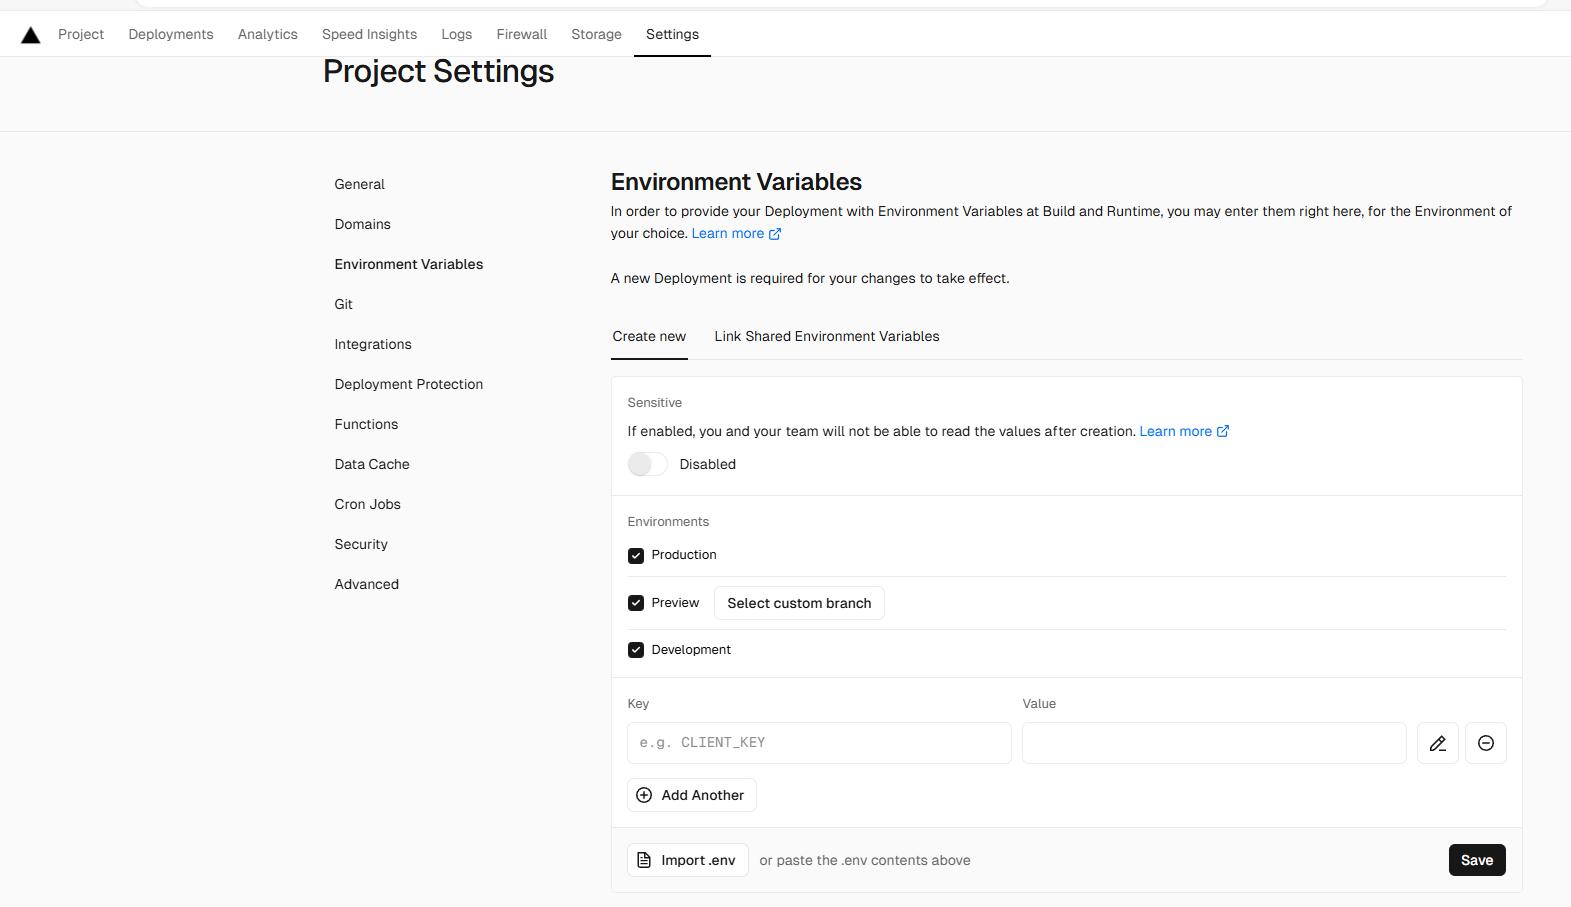


1 | 如果你使用 LeanCloud 国内版,请额外配置 LEAN_SERVER 环境变量,值为你绑定好的域名。 |
- (5) 环境变量配置完成之后点击顶部的 Deployments 点击顶部最新的一次部署右侧的 Redeploy 按钮进行重新部署。该步骤是为了让刚才设置的环境变量生效。
- (6) 此时会跳转到 Overview 界面开始部署,等待片刻后 STATUS 会变成 Ready。此时请点击 Visit ,即可跳转到部署好的网站地址,此地址即为你的服务端地址
- 绑定域名 (可选)(TODO)
- (1) 点击顶部的 Settings - Domains 进入域名配置页
- (2) 输入需要绑定的域名并点击 Add
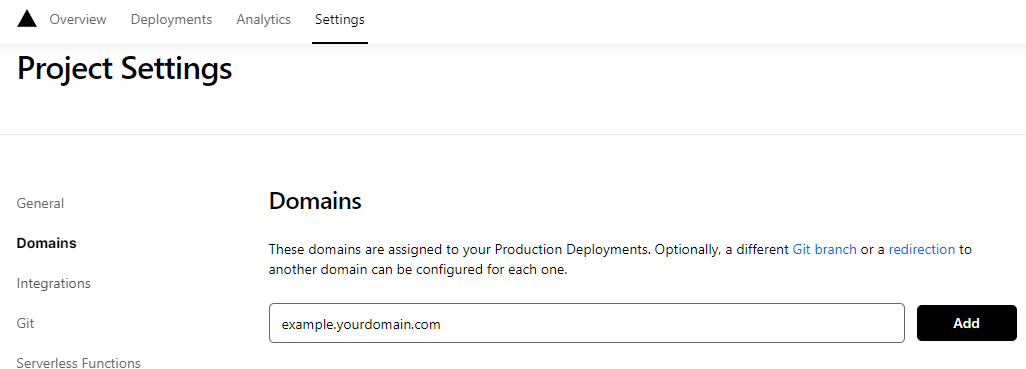
- (3) 在域名服务器商处添加新的 CNAME 解析记录
| Type | Name | Value |
|---|---|---|
| CNAME | example | cname.vercel-dns.com |
- (4) 等待生效,你可以通过自己的域名来访问了
- 在Next中配置
- 先到你hexo的站点目录下安装waline:
1 | npm install @waline/hexo-next --save |
- 找到Next主题配置文件,_config.yml进行如下配置,方便日后升级覆盖:
1 | # Waline 评论 |
- 添加评论表情包
在主题配置文件下的 waline 添加如下 emoji 代码
1 | # Waline 评论 |
更多表情参考 自定义表情
还有一个问题 就是大伙评论的东西 不翻墙刷新不出来
1 | 原因 jsdeliver被墙 参考链接🔗: [jsdelivr被墙,hexo-next切换为自定义CDN](https://www.xygblog.com/p/8ebdba58/) |
- leanClound作为数据库,同时可以用来作为图床存储文件,使其文件添加url地址

3.33.1 评论-邮箱通知(TODO)
详细可查看官方文档
当网站有用户发布评论或者用户回复评论时,Waline 支持对博主和回复评论作者进行通知。
- 博主通知支持多种方式,包括 QQ、微信、邮件等。
- 当访客的评论收到回复时,我们会对访客进行邮件通知。
具体步骤 可看 Hexo-Next主题搭建个人博客最新配置教程!的评论-邮箱通知
3.34 背景图上传CDN图床(性能优化) (TODO)
由于无缓存刷新(或者第一次加载页面)的时候 背景图片加载很慢(只有900多k)所以上传到CDN图床 https://cdnjson.com/
背景图链接:https://cdnjson.com/images/2022/11/21/bg1.jpg
3.35 通过修改 busuanzi 的解决(TODO)
- 新建 busuanzi.js 到 themes\hexo-theme-next\source\js\ 目录下,并copy
1 | var bszCaller, bszTag; !function () { var c, d, e, a = !1, b = []; ready = function (c) { return a || "interactive" === document.readyState || "complete" === document.readyState ? c.call(document) : b.push(function () { return c.call(this) }), this }, d = function () { for (var a = 0, c = b.length; c > a; a++)b[a].apply(document); b = [] }, e = function () { a || (a = !0, d.call(window), document.removeEventListener ? document.removeEventListener("DOMContentLoaded", e, !1) : document.attachEvent && (document.detachEvent("onreadystatechange", e), window == window.top && (clearInterval(c), c = null))) }, document.addEventListener ? document.addEventListener("DOMContentLoaded", e, !1) : document.attachEvent && (document.attachEvent("onreadystatechange", function () { /loaded|complete/.test(document.readyState) && e() }), window == window.top && (c = setInterval(function () { try { a || document.documentElement.doScroll("left") } catch (b) { return } e() }, 5))) }(), bszCaller = { fetch: function (a, b) { var c = "BusuanziCallback_" + Math.floor(1099511627776 * Math.random()); window[c] = this.evalCall(b), a = a.replace("=BusuanziCallback", "=" + c), scriptTag = document.createElement("SCRIPT"), scriptTag.type = "text/javascript", scriptTag.defer = !0, scriptTag.src = a, scriptTag.referrerPolicy = "no-referrer-when-downgrade", document.getElementsByTagName("HEAD")[0].appendChild(scriptTag) }, evalCall: function (a) { return function (b) { ready(function () { try { a(b), s = document.querySelector('[src*=BusuanziCallback]'), s.parentElement.removeChild(s) } catch (c) { bszTag.hides() } }) } } }, bszCaller.fetch("//busuanzi.ibruce.info/busuanzi?jsonpCallback=BusuanziCallback", function (a) { bszTag.texts(a), bszTag.shows() }), bszTag = { bszs: ["site_pv", "page_pv", "site_uv"], texts: function (a) { this.bszs.map(function (b) { var c = document.getElementById("busuanzi_value_" + b); c && (c.innerHTML = a[b]) }) }, hides: function () { this.bszs.map(function (a) { var b = document.getElementById("busuanzi_container_" + a); b && (b.style.display = "none") }) }, shows: function () { this.bszs.map(function (a) { var b = document.getElementById("busuanzi_container_" + a); b && (b.style.display = "inline") }) } }; |
- 可以把修改后的静态文件放在博客里,然后修改 themes\hexo-theme-next\layout_third-party\statistics\busuanzi-counter.njk <script> 中的 src
1 | {%- if theme.busuanzi_count.enable %} |
冲突解决原理参考链接🔗:https://ouuan.moe/post/2022/08/busuanzi-and-live2d
3.36 不蒜子的访客人数和文章阅读统计功能
NexT主题已集成了不蒜子的访客人数和文章阅读统计功能
- 在主题配置文件中
1 | # Show Views / Visitors of the website / page with busuanzi. |
只开启了文章访问次数 总访问人数和总访问次数有bug尚未修复 如需开启请先修复
修复参考链接🔗: https://muyuuuu.github.io/2019/11/22/busuanzi-notdisplay/
3.37 文末尾版权声明
主题配置文件中直接搜索并且修改以下内容即可:
1 | creative_commons: |
3.37 友情链接
主题配置文件中直接搜索关键字 Blog rolls,设置即可:
- icon:设置图标
- title:标题
- links:输入你的友情链接,可以直接修改或者添加
1 | # Blog rolls |
3.38 添加RSS订阅(TODO,没有设置)
- 首先执行命令
1 | npm install hexo-generator-feed --save |
- 打开 Hexo 站点下的 _config.yml ,添加如下配置:
直接在底部复制粘贴以下内容即可
1 | # feed |
3.39 打赏功能(TODO)
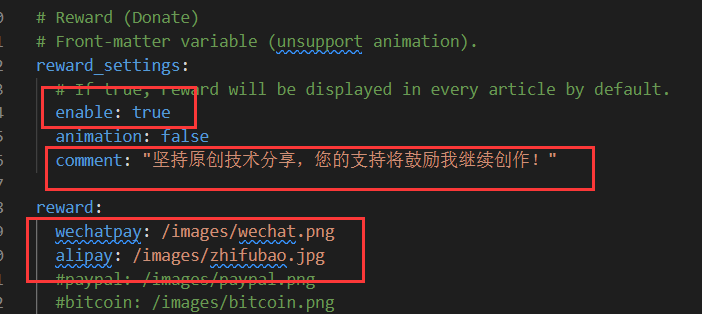
在 主题的 config中找到如下的 raward功能
enable选择打开,comment输入文字
在缀主题的images文件夹中把你的付款码的图片放到 /blog /themes /next /source /images/ 中,它会按照这个路径寻找图片
3.40 博客基本信息
修改 博客的标题,副标题,描述,等等基本信息。。。
- 在 blog根目录下打开 _config.yml 配置文件,直接修改以下信息即可
注意,语言要改成 zh-CN即中国,其他的自己随便改改
1 | ``` |
3.42 修改文章底部的#号的标签,改为图标(TODO)
修改模板/themes/next/layout/_macro/post.swig
搜索 rel=“tag”>#,将 # 换成
3.43 文章加密访问(encrypt)
参考:https://blog.csdn.net/weixin_58068682/article/details/116614622
- 安装
- 使用hexo-blog-encrypt插件进行加密
- 安装如下命令
1 | npm install --save hexo-blog-encrypt |
- 快速使用
- 将 “password” 字段添加到您文章信息头就像这样
1 | --- |
再使用 hexo clean && hexo g && hexo s 在本地预览加密的文章
-
设置优先级
文章信息头 > 按标签加密 -
高级设置
文章信息头
1 | --- |
_config.yml
1 | # Security |
- 对博文禁用 Tag 加密
只需要将博文头部的 password 设置为 “” 即可取消 Tag 加密.
1 | --- |
3.44 全局播放背景音乐(使用 Pajx 实现)-切换页面不打断
即实现页面跳转刷新后音乐不间断播放 (在博客文章中的网易云插件无法实现全局播放。)
-
打开themes\hexo-theme-next\layout文件夹找到_layout.swig
-
在<\head>标签前添加下面代码,并保存。
1 | <head> //粘贴到这里 |
- 在主题的配置文件中找到pajx,将它设置为true,并保存。
1 | # Easily enable fast Ajax navigation on your website. |
四、部署到github
4.1 新建Repository
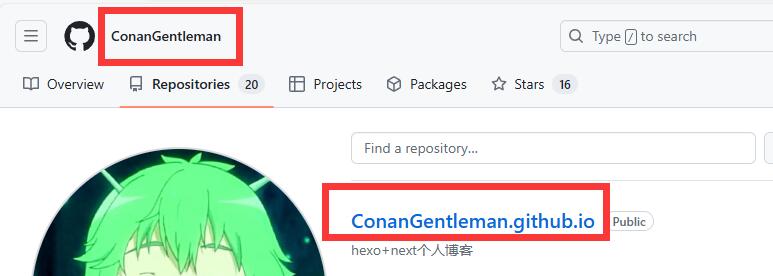
在github上新建一个 Repository,Repository name一定要是 你的用户名.github.io
4.2 复制仓库地址
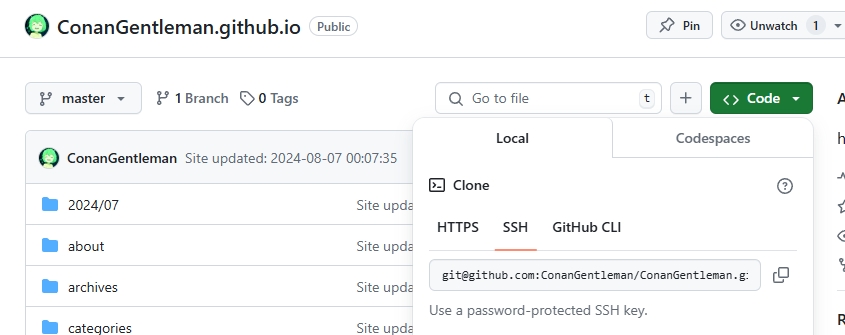
建议复制ssh,
4.3 修改站点配置文件

4.4 安装插件
在Blog目录打开cmd命令输入如下命令:
1 | npm install hexo-deployer-git --save |
4.5 部署到github
继续在cmd里面分别运行一下命令
1 | hexo clean |
4.6 访问站点
通过 你的用户名.github.io 访问你部署在github的博客
4.7 绑定个人域名
参考:https://blog.csdn.net/qq_44161695/article/details/117605288
本片大部分参考的该博文,但有些地方存在问题,因此做重新梳理。https://blog.csdn.net/loze/article/details/94208742
文中带(TODO)表示我未进行设置
